I used to think walls were just… walls. Flat surfaces you hang TVs on and forget about. Then my smart thermostat started misreading room temperatures because of a giant tape line air leak around a patch, and I realized how wrong that was.
If you care about smart homes, you have to care about what is behind and inside your walls. The short version: bad drywall work will mess with your cables, your sensors, your sound, your comfort, and even your energy use. In a tech focused house, “good enough” patch jobs are not really good enough anymore. If you live along the Front Range and your walls look tired, crooked, or beaten up, a proper Denver drywall repair service can be as important as any new device you add to your setup.
Why smart homes still need boring, solid walls
It is easy to spend weekends comparing smart speakers and never think about the sheet of gypsum behind them. Drywall feels low tech. Cheap. Replaceable. You might even think “nobody looks at it in the dark anyway.”
But your walls are quietly part of your tech stack.
If your walls are full of cracks, gaps, and sloppy patches, you are forcing your smart devices to work harder and perform worse than they should.
Here is the simple link between drywall and smart home tech:
- Smart sensors read the air and surfaces in your room.
- Cables and low voltage wires run inside your walls.
- Speakers, TVs, access points, and panels mount on drywall.
- Heat and sound move through gaps and thin spots in your walls.
If the drywall is uneven, poorly taped, or full of random holes, it can cause:
- Wrong temperature and humidity readings
- Poor Wi‑Fi placement and ugly cable routes
- Buzzing or rattling around in‑wall speakers
- Echoey rooms that confuse voice assistants
- Energy loss that your smart thermostat then tries to “fix”
Once you see it that way, drywall stops being a boring backdrop. It is more like the chassis around all the fancy parts.
How bad drywall can confuse your smart devices
This is where it starts to feel a bit weird: a crack in the corner can mess with your tech. It sounds overdramatic, but there are real ways this happens.
Temperature and humidity sensors live in real air, not lab air
You probably have at least one of these:
- Smart thermostat
- Climate sensors for multi room control
- Humidity sensor for bathroom fans
- Smart vents that open and close by room
These devices assume the air they are reading is the same air you are breathing. But if you have:
- Gaps along baseboards
- Poorly patched holes around boxes and plates
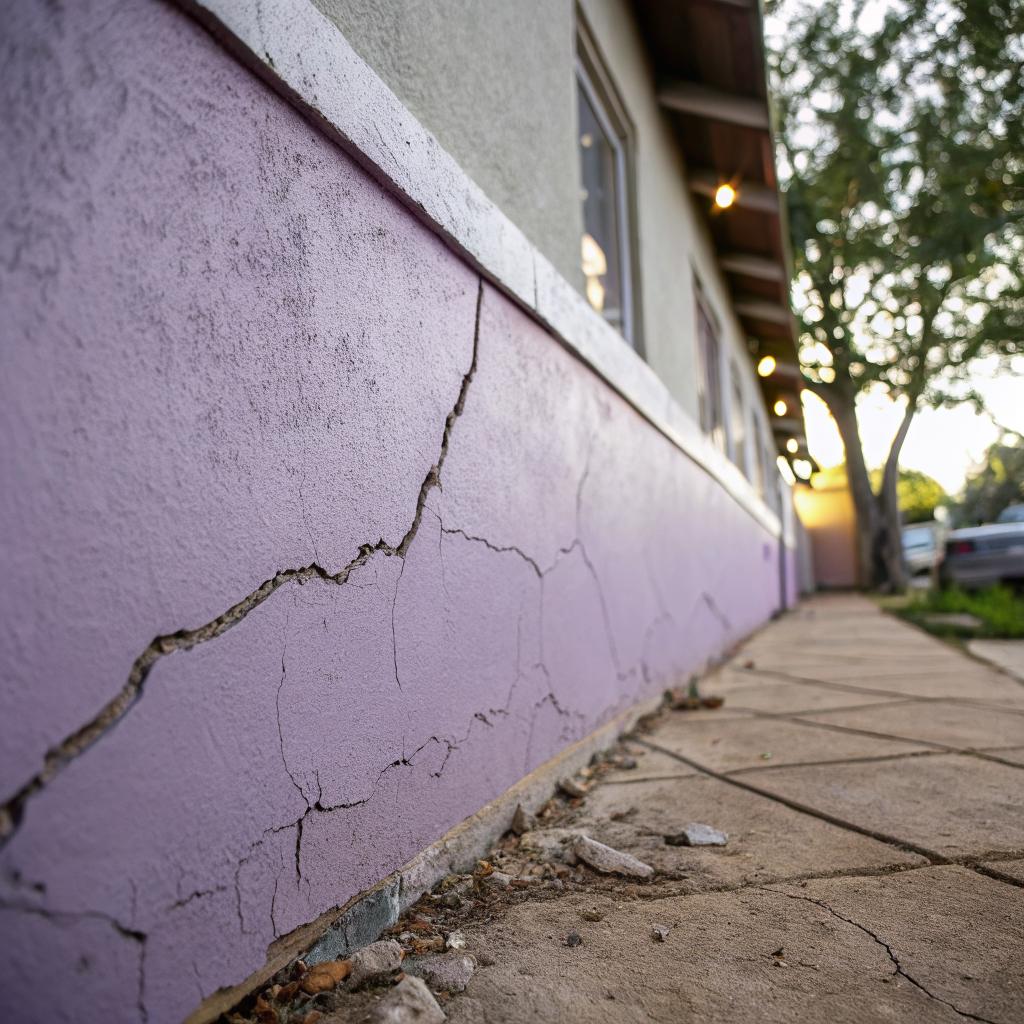
- Hairline cracks along corners that leak air from cavities
- Loose drywall around recessed lights
then your sensors may be reading a blend of room air and air from inside the wall or attic.
I once saw a hallway sensor that always read 4 degrees colder than every other device in the house. The owner thought the sensor was defective. The problem was a fist sized bad patch around an old thermostat cable. Air from inside the wall cavity was leaking past the sensor.
If your climate readings never match how the room “feels,” you might not have a sensor problem. You might have a drywall and air leakage problem.
Now think about all the automation that depends on accurate readings:
- Thermostat schedules and learning algorithms
- Dehumidifier or bath fan triggers
- Smart blinds based on room temperature
- Alerts for “unusual” temperature swings
If your base data is off because your walls leak air around bad repairs, the whole logic stack sits on shaky ground.
Sound, echo, and voice assistant accuracy
Voice assistants have come a long way. But they still get confused in rooms that echo.
Drywall plays a big role in how sound behaves:
- Perfectly flat, hard walls reflect sound and create echo.
- Soft textures and thicker assemblies absorb and scatter sound.
- Gaps and loose joints can buzz or rattle with bass notes.
Now mix that with real life:
- Bad patches that are slightly hollow when you tap them.
- Cracked joints between wall and ceiling.
- Dented areas that were smeared with compound but never sanded flat.
You end up with strange reflections and little vibrations. Voice commands bounce around for an extra split second. Or a panel mic picks up more room noise than it should. You might just shrug and repeat yourself louder, but the root cause could be as simple as loose board near the ceiling.
For home theater rooms the effect is stronger. In wall speakers in a flimsy, badly patched wall sound different from the same speakers in a stiff, well built cavity. Bass leaks into other rooms, mids get muddy, and the whole system feels cheap even if the hardware is fine.
Smart blinds, projectors, and wall mounted screens
Many tech upgrades now attach directly to drywall:
- Motorized blind tracks
- Wall mounted control panels and tablets
- Projector screens and ultra short throw projectors
- TVs on articulating mounts
All of these expect a few things from the wall:
- Enough strength for proper anchors
- A reasonably flat surface
- Stable joints that do not move over time
If your wall has been patched ten times, screws stripped, anchors pulled out and filled, and seams barely taped, you start losing those guarantees.
You might notice:
- TV mounts that will not sit level even with a leveler.
- Projector images that look wavy because of uneven mud work.
- Blind tracks that bind because the wall bows in the middle.
- Tablets that rock slightly when tapped because the drywall behind flexes.
So while it is tempting to skip proper repair before mounting things, it tends to backfire. A clean, repaired, and properly fastened sheet gives your gear a stable base.
What “smart walls” really means in a Denver home
I am not talking about walls that are literally digital panels. There are companies doing that, but most of us are not there.
For a regular house along the Front Range, “smart walls” usually means something closer to:
A wall that is flat, solid, well sealed, and friendly to wiring, sensors, and mounts, so your tech can do its job without fighting hidden problems.
In Denver you also have some special conditions:
- Dry air that is hard on joints and tape.
- Temperature swings between day and night.
- Older homes with plaster that has been “converted” to drywall in strange ways.
- Basements that were finished in phases by different people.
Put tech on top of that mix and things get complicated quickly.
Here are a few aspects of “smart walls” in real houses.
Flat enough for projection, tracking, and panels
A smart wall should be visually quiet. Not just for looks, but for tech that expects straight lines.
Consider:
- Ultra short throw projectors that throw a large image on a very short path.
- Augmented reality or gaming setups that track surfaces.
- Wall mounted LED panels or video walls.
These want:
- Consistent texture
- No ridges from bad taping
- No visible patch outlines under paint
- No sagging seams
If you want to judge a wall for “tech readiness,” stand at a shallow angle and shine a raking light across it. You will see every hump and valley. That is also how camera based sensors and projection see your wall.
A careful drywall repair job can take a wavy, patchy surface and turn it into something that works for projection and mounting. It is not magic, but it does take more effort than smearing some mud and calling it good.
Sealed for comfort and energy use
This sounds a bit boring compared to smart bulbs, but it matters.
Drywall is part of your air barrier. When it is full of:
- Unsealed penetrations for cables
- Rough cut holes around outlets
- Cracks at the top plate and corner joints
then your HVAC system fights an uphill battle. Your smart thermostat can learn all it wants, but if conditioned air keeps sneaking into wall cavities, you are mixing outside conditions with your indoor environment.
In Denver, winter is dry and cold, and air leaks can be very noticeable near windows and outside walls. An honest drywall pro will often combine repair with:
- Backer rod or foam in larger gaps
- Caulk at trim joints
- Better fitting outlet boxes and gaskets
You do not need to chase perfection, but cutting down on leakage helps your smart climate gear behave more predictably.
Cable and device friendly cavities
A “smart wall” is also one where:
- You can fish low voltage cables without hitting mystery screws.
- You know where blocking is for heavy mounts.
- Access panels for valves, manifolds, or hubs are clean and easy to open.
Many older patch jobs ignore future access. Someone cuts a massive hole to fix a pipe, drops a bit of scrap drywall over it, and buries everything in joint compound. The work looks fine on day one, right up until you need to add a new Ethernet drop or access that valve again.
A more thoughtful approach keeps tech needs in mind:
- Use of low voltage plates instead of rough holes for cables.
- Creating tidy access doors instead of sealing everything forever.
- Keeping repair screws away from known wire routes.
This is where a drywall repair job intersects with basic low voltage planning.
Types of drywall problems that tech people should not ignore
Some flaws are purely cosmetic. Others hint at structural or comfort issues that will touch your smart gear.
Here is a simple table that might help you separate the two.
| Wall problem | What you see | Why a tech person should care |
|---|---|---|
| Hairline ceiling or corner cracks | Thin lines, often recurring after repainting | Can leak air, impact temperature readings, and cause small sound reflections |
| Bulges and ridges at seams | Visible under side light, wall feels “hilly” | Messes with projection, panel mounting, and clean aesthetics |
| Soft or hollow patches | Area moves when pressed, dull or hollow sound when tapped | Weak for mounting devices, can buzz or rattle with audio |
| Repeated nail pops and screw pops | Small round bumps, sometimes cracking through paint | Signs of movement that can twist mounts, shelves, and tracks over time |
| Bad cutouts around outlets and plates | Large gaps behind plates, uneven edges | Air leakage near sensors, messy cable passes, dust into devices |
| Visible tape lines and patch outlines | Shadows under certain light, texture mismatch | Ugly next to sleek tech, can show through during projection |
None of these on their own will “break” your smart system. But they stack up. At some point, throwing more tech at a badly finished room gives less and less return.
DIY patch vs pro repair in a smart home
I am not going to say you should never do your own drywall repair. That would be silly. Small dings and holes are fair game for most people.
But there are some cases where, if you care about your tech setup, calling in a pro is less headache in the long run.
Good DIY targets
You can usually handle:
- Small nail holes from pictures or sensors.
- Tiny corner dings that do not expose paper.
- Very minor hairline cracks that have not returned after one season.
Use light spackle, a small knife, sand lightly, and touch up paint. These fixes do not really affect your devices.
DIY projects that go wrong a lot
People often underestimate:
- Ceiling repairs over 6 inches across.
- Repairing water damaged board near smart fixtures.
- Fixing old patches around thermostat wires and cable boxes.
- Resurfacing walls for projector use.
The risk is not just that it looks a bit off. Poor work in these areas can mean uneven surfaces, weak anchoring, and air leakage near devices.
If you plan to mount expensive tech on a wall, or project onto it, it is worth having the surface repaired and finished by someone who does that all day long.
When pro drywall repair quietly protects your tech investment
Here are some situations where a real drywall repair job helps:
- You are prepping a room for an in wall speaker system.
- You want a projector setup with a very flat screen wall.
- You are building a dedicated work from home office with a lot of gear.
- You are planning to add multiple wall panels or touchscreens.
The cost of proper drywall work is small compared to the total price of displays, speakers, network gear, and automation hardware.
A pro can:
- Rebuild loose sections around heavy mounts.
- Blend patches so they are invisible under flat or matte paint.
- Plan where extra backing should go for future devices.
- Coordinate with your low voltage installer if needed.
It is the kind of boring prep work that makes your tech look like it belongs.
Planning drywall work as part of a smart home upgrade
If you are serious about your smart home, it helps to think of drywall repair as part of the project, not an afterthought.
Step 1: Map your tech zones
Walk your house and mark:
- Rooms where you will mount TVs, panels, or projectors.
- Spots where you need clean cable runs behind drywall.
- Areas where sensors live and read the environment.
- Walls that anchor speakers, tracks, or heavy shelves.
Pay more attention to those walls than, say, a closet that nobody will see.
Step 2: Inspect those walls visually and by feel
Use both your eyes and your hands:
- Look along the wall at a shallow angle for ridges and waves.
- Press gently near old patches to check for movement.
- Check corners and ceilings for cracks, especially near sensors and vents.
- Remove a few plates and look at gaps around boxes.
Make a list. Not every item needs a pro, but it gives you a picture of how much work is needed.
Step 3: Decide on the finish level
Not every wall needs to be studio quality. For tech heavy areas, you might want:
- Flat or matte paint to reduce glare around screens.
- Smoother texture near projectors and cameras.
- Stronger backing where you expect future mounts.
For other areas, a regular “builder” level finish is likely fine.
Step 4: Coordinate timing with electricians and low voltage installers
The sequence matters a bit:
- Run new wires and install boxes before final drywall repair.
- Get all cuts and holes made once, then patch in one pass.
- Finish paint after sanding dust is completely gone, especially around sensors and intakes.
If you skip this planning, you might end up patching the same spot multiple times as new ideas appear.
What to ask a drywall pro when you care about tech
If you are in Denver or nearby, you will find plenty of drywall providers. Some are more used to working in tech heavy spaces than others.
When you talk with them, you can ask:
1. How do you handle areas that will support heavy mounts?
You want answers that include:
- Locating studs accurately.
- Adding blocking or backing if needed.
- Using appropriate anchors for different wall types.
If they shrug and say “we just patch what is there,” and you know you will mount a 75 inch TV, that is a mismatch.
2. Will the finish be suitable for projection or flat panels?
If you plan to use the wall for visuals, ask for:
- Smoother finish in that area.
- Careful feathering of joints to avoid visible ridges.
- Advice on paint sheen near screens and sensors.
They do not need to be home theater experts, but they should understand the basic interaction between light and surface.
3. Can you help with air sealing while you repair?
If they are open to:
- Foaming larger gaps before patching.
- Caulking trim joints that have opened up.
- Improving outlet and switch box cutouts.
then your climate gear will likely benefit.
4. How will the work affect my existing devices?
If you already have:
- Smart thermostats
- Wall sensors
- Mounted speakers or cameras
ask how they plan to protect them from dust and vibration. Good pros will suggest:
- Temporary removal of some devices.
- Full plastic covering near sanding areas.
- Vacuum sanding where possible for less dust.
This small step can extend the life of your gear.
Drywall, soundproofing, and smart audio
There is one more angle that tech minded people care about: sound isolation.
Smart speakers, voice calls, conference rooms, and home theater setups all rely on decent sound control. Drywall is a big part of that.
Where better drywall work helps sound
You do not need to build a recording studio, but some practices matter:
- Using the correct thickness of board where code or design expects it.
- Fastening screws properly so boards do not rattle.
- Staggering seams and avoiding long, continuous cracks.
- Filling obvious gaps at edges and corners.
If you pair that with:
- Thoughtful placement of soft furnishings.
- Basic acoustic treatment for echoey rooms.
- Reasonable volume habits.
your voice assistants and audio gear will have a much nicer environment.
When you might ask for extra sound control
In Denver houses, some common spots where people want better sound control are:
- Offices near busy streets.
- Basement theaters under bedrooms.
- Nurseries next to living rooms.
- Shared walls in townhomes and condos.
Drywall pros can:
- Add extra layers of board in key locations.
- Use different mounting methods that reduce sound transfer.
- Seal seams and edges more carefully.
None of this is “smart” in the gadget sense, but it supports a smart lifestyle by making your devices easier to hear and less annoying to others.
Common myths about drywall in tech heavy homes
I hear the same few thoughts a lot, and some of them are just off.
“If the paint looks fine, the wall is fine”
Paint hides a lot. It does not tell you:
- Whether screws are biting properly.
- Whether gaps behind plates are leaking air.
- Whether the surface is flat enough for projection.
A smooth paint job on a wavy, loose wall is still a problem for tech.
“Only exterior walls matter for climate control”
Interior walls can leak air between floors and rooms. Your sensors do not care whether the air came from outside or a hot attic void. They just see odd swings and trigger the wrong routines.
“Drywall and tech are separate trades, they do not affect each other”
This is more of an industry comfort thing. In real houses, the line is blurry. A simple cable pass through badly cut into drywall can mess with sound and climate in a room. A poorly anchored patch can fail under a heavy mount.
The two crafts overlap more than people admit.
Q & A: Do your walls need a “smart” upgrade?
Q: My smart home setup works “ok”. When is it worth caring about drywall?
A: If you are fine with how things look and feel, you do not need to change anything right now. But if you are about to invest in new gear, especially mounts, projectors, in wall speakers, or more sensors, it is a good moment to ask whether your walls are ready for that. Fixing drywall first is often cheaper than fixing broken mounts or re doing bad installations later.
Q: Is this just about looks, or will I actually notice a difference in how my tech behaves?
A: In some cases you will notice a real change. Better sealed walls can make room temperatures more stable, which gives you fewer weird alerts and less “why is it running again?” moments with your HVAC. Flatter, stiffer walls can fix buzzing near speakers, tilt in TV mounts, and wavy projector images. Not every fix is dramatic, but the overall experience tends to feel more solid.
Q: Can I just patch around devices myself and hope for the best?
A: You can, but if the wall is already a patchwork of old fixes, more casual patches usually make it worse, not better. If you only have a few small marks, DIY is fine. If you see long cracks, hollow spots, or bad waves where you want to install something expensive, it is more honest to bring in someone who does drywall all week and let your smart gear live on a stable surface.